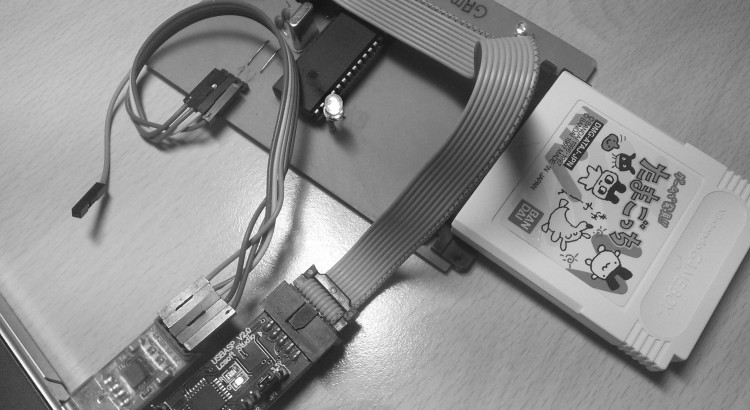
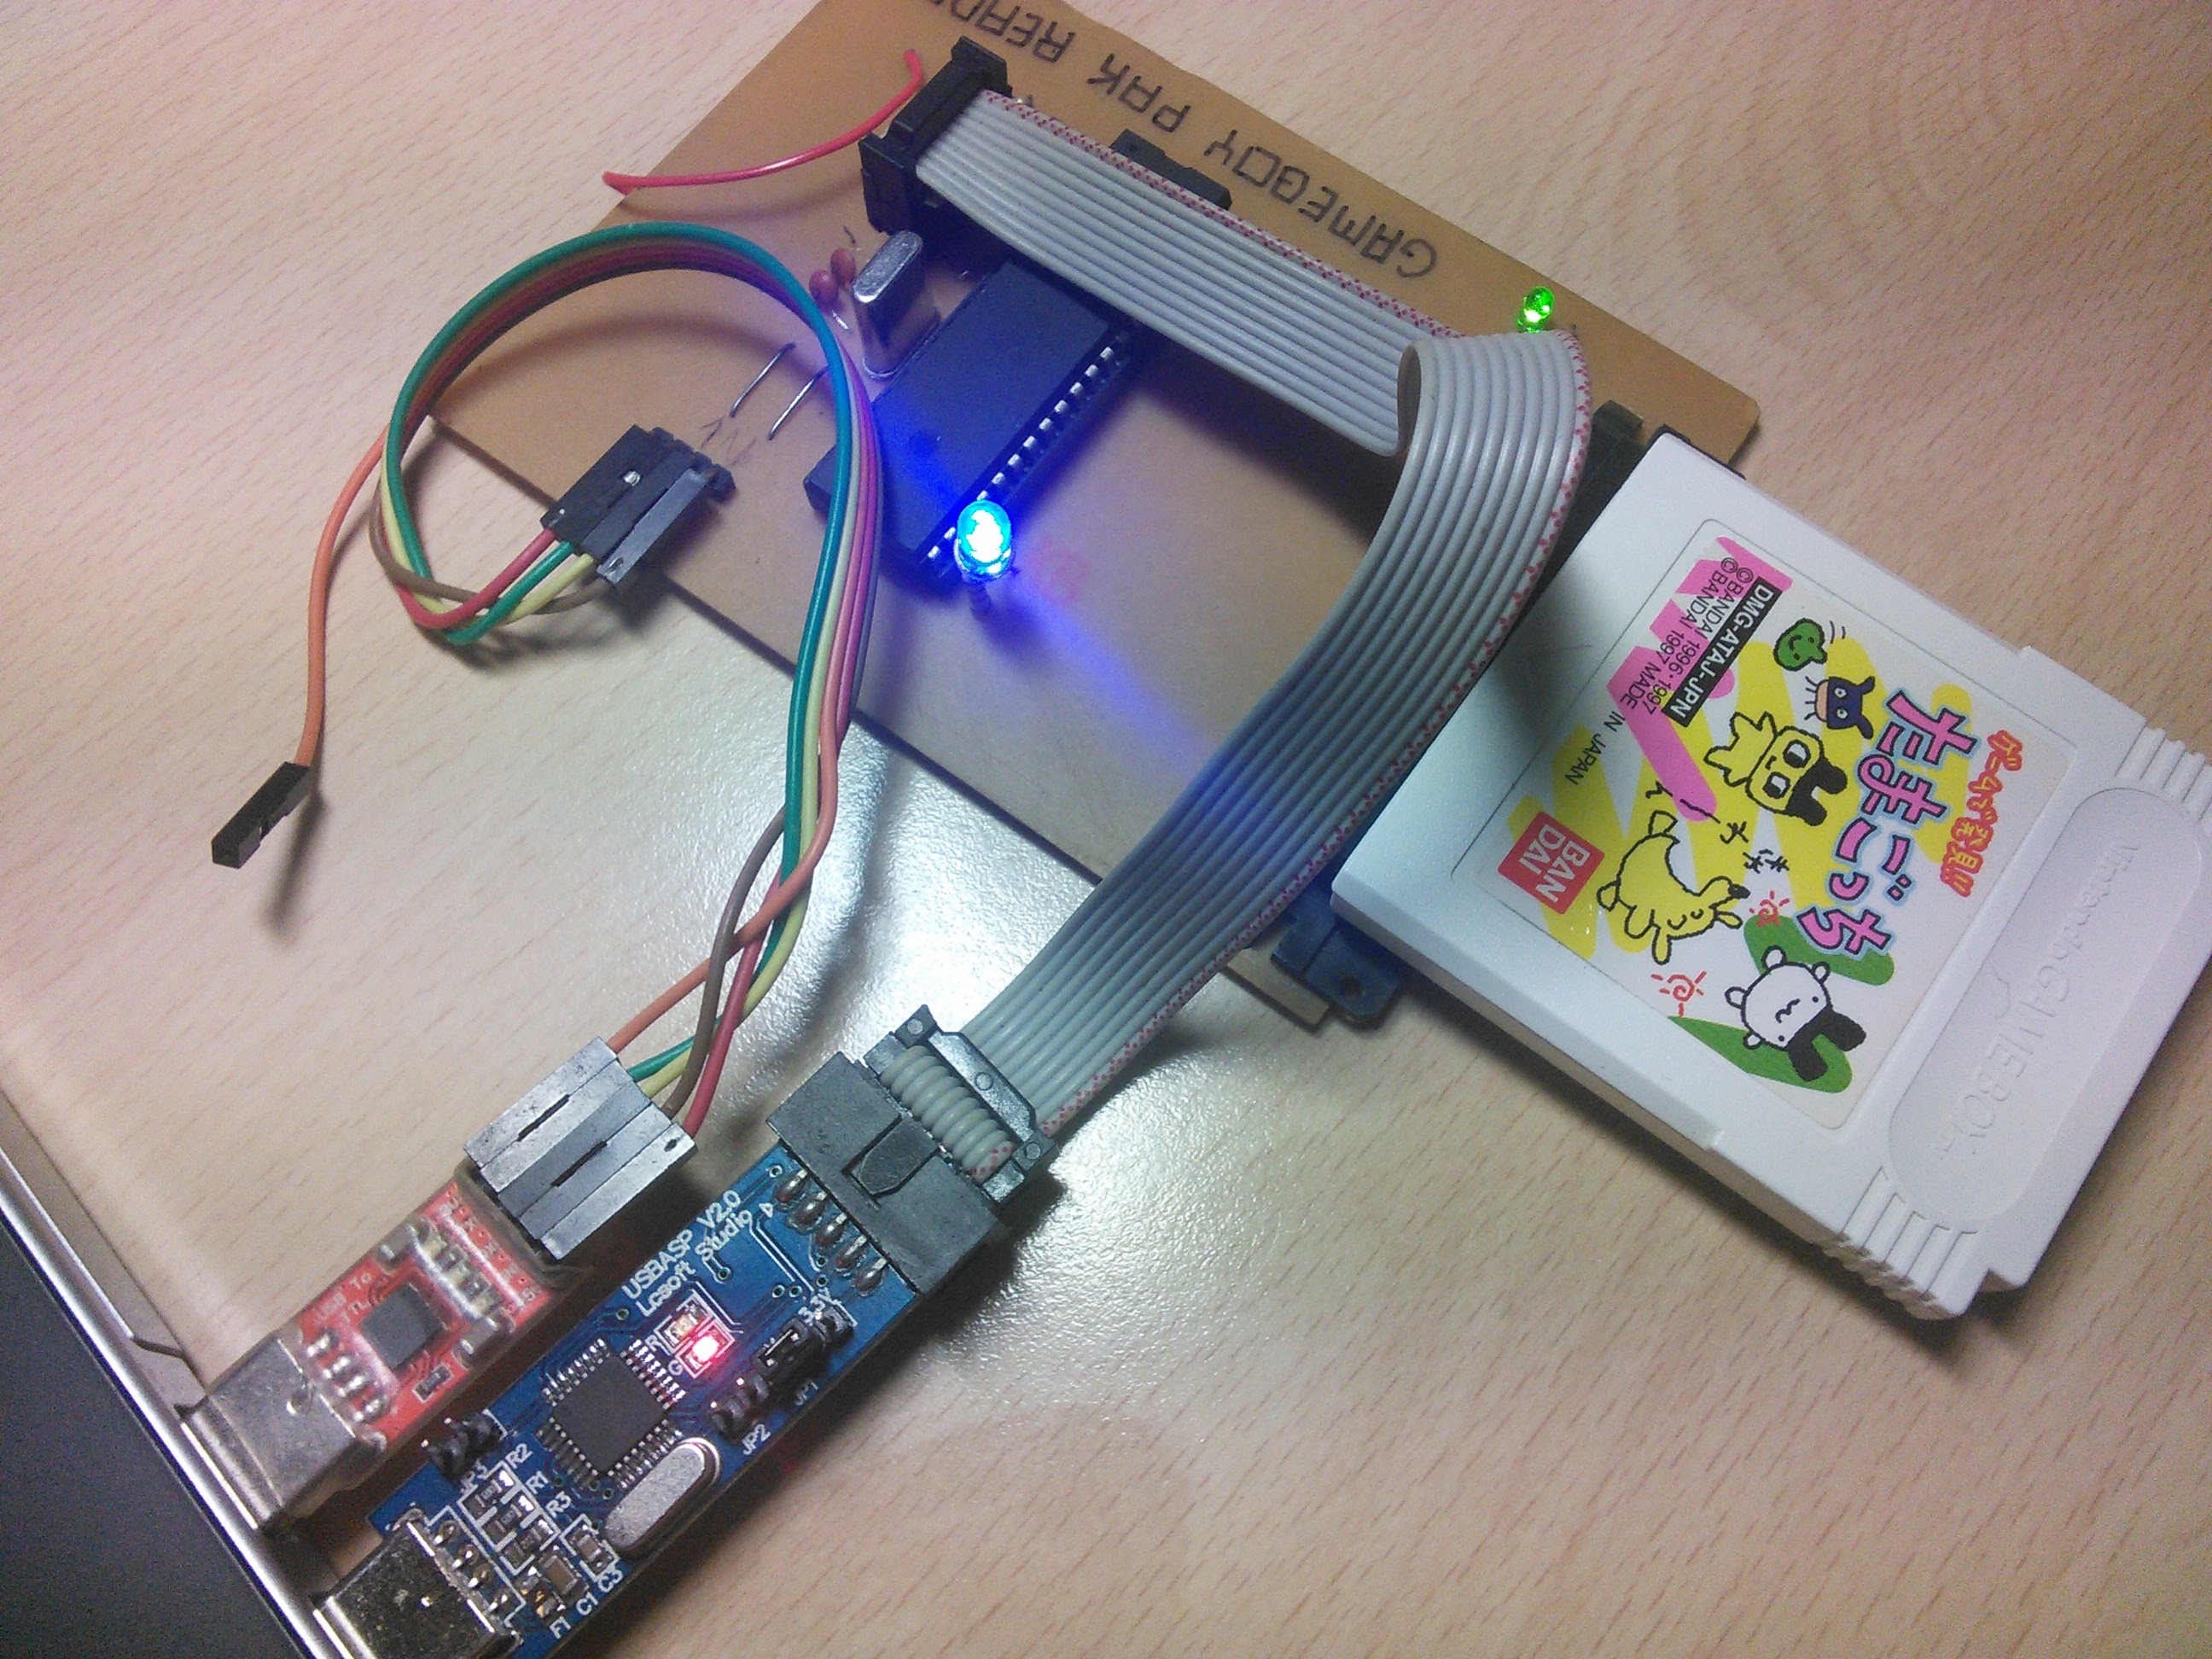
The board basics.
In a prior post, I presented my hardware project for a Game Boy cartridge reader. Since then, I had some time to write some code for it. I thought that a good start would be writing the routines for basic operations, like outputting address and data into the pins of the microcontroller, reading or writing a byte at a specific address, and setting up the serial port.
When I designed the board, I tried to make the interaction between hardware and software the best possible. To exemplify, the data pins on the cartridge are port C of the microcontroller, in a which way that D0-PINC0, D1-PINC1, D2-PINC2… ans so on. Still, the Addres bus followed the same standard, but as this bus is 16 bits wide, two ports(A and B) were used. This way, almost none manipulation is needed before writing bytes in the buses.
#define DATAOUT PORTC
#define DATAIN PINC
#define ADRH PORTA
#define ADRL PORTB
Atmel Studio 6 was used to write this code. This is AVR-GCC, C language for the Atmel microcontrollers. Arduino could be used with some adaptations, but I wanted to polish my microcontroller skills anyway. I try to explain the basics, but some basic knowledge in the language is needed. In any case, the code has comments to help understanding.
PORTC is the register for writing tin the port C, while PINC is the register for reading it. The Address bus is always a output, so the registers PINA and PINB don’t need to be read. We can see that still there are some other pins in the cartridge connector below.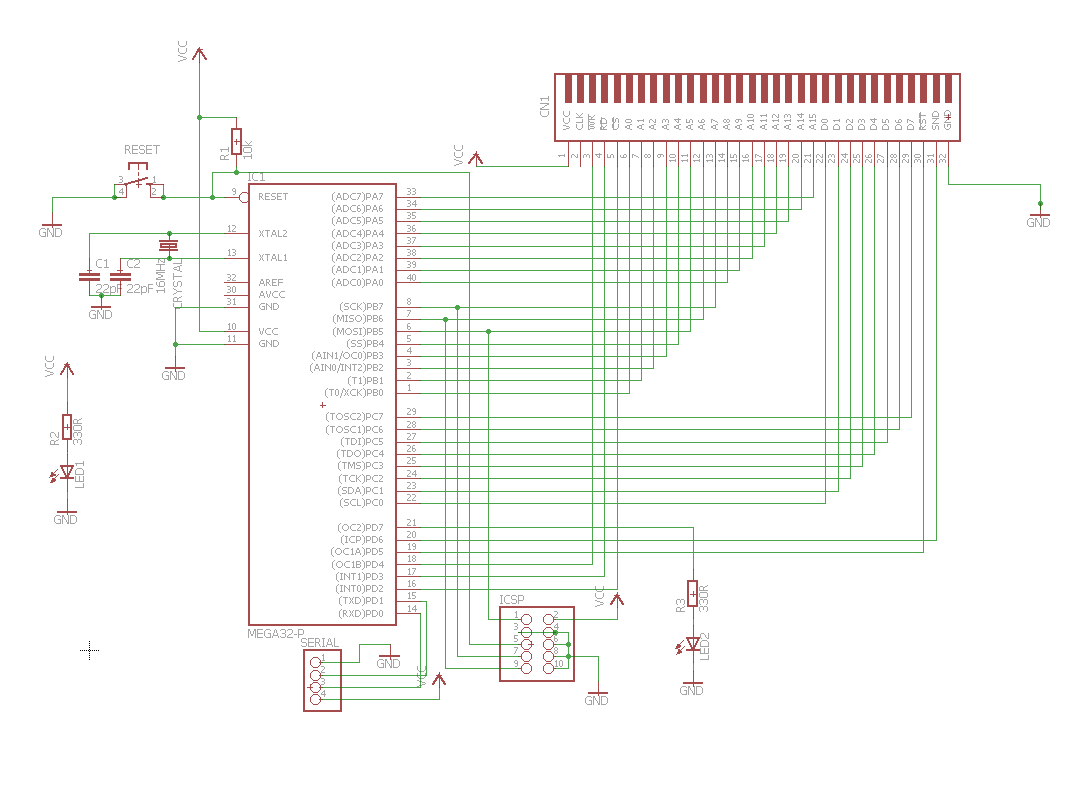
These pins are /WR, /RD, /CS, /RESET and SND. Well, I still have not seen any cartridge using the sound input(SND), and it is not necessary for dumping ROMs and this kind of thing. But is connected anyway if I ever need it. The other pins are explained below:
- /WR: From ‘write’, it is used to write bytes to the cartridge. A low pulse in this pin is used to store bytes in the RAM or select banks.
- /RD: Stands for ‘read’, this Pin is used connected to the /OE of the ROM. It instructs the cartridge to write the byte in the selected memory location to the data bus.
- /RESET: You know what this means, just leave it always HIGH while in operation.
- /CS(or /MREQ): It is the enable pin. But from which chip?Read notes below.
How I lost hours of my time below:
Note[1]:The Reset pin must be always in high state while the cartridge is being used. I did the mistake of leaving it low(confused some registers) and it cost me a lot of time to understand what was going on. Miraculously, some cartridges still worked while this was low, leading me to believe the problem was something else.
Note[2]:The /CS pin is the pin that enable the RAM, It is connected to the RAM only. The most significant address line (A16 )is connected to the /CS of the ROM. This means that any access to a location higher than $8000 disables the ROM. To use the RAM, is still necessary after the drop in the /CS line, to write a comand in the data bus to enable RAM access.
Hardware
I still don’t have built the newest version of the board, unfortunately I am still using the first version. You can see I red wire fixing a mistake that is not present in the last board. There are no meaningful differences between this board and the files for download.
Serial Port
The code for the serial port was no secret, just used some functions available in the datasheet of the microcontroller and added a queue to store the incoming bytes. The serial code still is kind of mistery. It is not needed to modify it for now. People have used the serial in Arduinos without knowing what happens in the background. See serial.h if you want to check or edit it.
The cartridge Header
Cameboy cartridges are not really easy to read, there is a logic of bank switching to read all the ROM and RAM. To make it worse, there are 4 different bank controllers and several sizes of ROMs and RAMs.
However, the first bank is read similarly for every cartridge. This bank starts at $0000 and ends at $3FFF. While all the other banks are switched in the area from $4000 to $7FFF. In the first bank, it is possible to find information about the cartridge. For example:
$0134-0142 Title of the game in UPPER CASE ASCII.

$0143             0 = Color GB, $00 or other = not Color GB

$0147             Cartridge type:
0-ROM ONLY                     12-ROM+MBC3+RAM
1-ROM+MBC1                     13-ROM+MBC3+RAM+BATT
2-ROM+MBC1+RAM                 19-ROM+MBC5
3-ROM+MBC1+RAM+BATT            1A-ROM+MBC5+RAM
5-ROM+MBC2                     1B-ROM+MBC5+RAM+BATT
6-ROM+MBC2+BATTERY             1C-ROM+MBC5+RUMBLE
8-ROM+RAM                      1D-ROM+MBC5+RUMBLE+SRAM
9-ROM+RAM+BATTERY              1E-ROM+MBC5+RUMBLE+SRAM+BATT
B-ROM+MMM01                    1F-Pocket Camera
C-ROM+MMM01+SRAM               FD-Bandai TAMA5
D-ROM+MMM01+SRAM+BAT           FE - Hudson HuC-3
F-ROM+MBC3+TIMER+BATT          FF - Hudson HuC-1
10-ROM+MBC3+TIMER+RAM+BATT
11-ROM+MBC3
void cartInfo(void){
        Serial_print("Title of the game in ASCII:");
	for (int i=0x0134;i<=0x0142;i++)
	{
		if(readByte(i)<128) {Serial_write(readByte(i));}//some fake cartridges using values outside ASCII range.
	}Serial_write('\n');

	Serial_print("Gameboy/Gameboy Color?");
	uint8_t data =readByte(0x0143);
	if (data==0x80){
		Serial_println("	Cartridge with color function");
	}else{
		Serial_println("	Cartridge with no color function");
	}
	Serial_print("Super Gameboy functions?");
	data =readByte(0x0146);
	if (data==0x03){
		Serial_println("	Cartridge with SGB functions");
	}else{
		Serial_println("	Cartridge without SGB functions");
	}
	Serial_print("Cartridge Type:");
	data =readByte(0x0147);
	switch (data){
		case 0x00:Serial_println("	ROM ONLY");break;
		case 0x01:Serial_println("	ROM+MBC1");break;
		case 0x02:Serial_println("	ROM+MBC1+RAM");break;
		case 0x03:Serial_println("	ROM+MBC1+RAM+BATTERY");break;
		case 0x05:Serial_println("	ROM+MBC2");break;
		case 0x06:Serial_println("	ROM+MBC2+BATTERY");break;
		case 0x08:Serial_println("	ROM+RAM");break;
		case 0x09:Serial_println("	ROM+RAM+BATTERY");break;
		case 0x0B:Serial_println("	ROM+MMM01");break;
		case 0x0C:Serial_println("	ROM+MMM01+SRAM");break;
		case 0x0D:Serial_println("	ROM+MMM01+SRAM+BATT");break;
		case 0x0F:Serial_println("	ROM+MBC3+TIMER+BATT");break;
		case 0x10:Serial_println("	ROM+MBC3+TIMER+RAM+BATT");break;
		case 0x11:Serial_println("	ROM+MBC3");break;
		case 0x12:Serial_println("	ROM+MBC3+RAM");break;
		case 0x13:Serial_println("	ROM+MBC3+RAM+BATT");break;
		case 0x19:Serial_println("	ROM+MBC5");break;
		case 0x1A:Serial_println("	ROM+MBC5+RAM");break;
		case 0x1B:Serial_println("	ROM+MBC5+RAM+BATT");break;
		case 0x1C:Serial_println("	ROM+MBC5+RUMBLE");break;
		case 0x1D:Serial_println("	ROM+MBC5+RUMBLE+SRAM");break;
		case 0x1E:Serial_println("	ROM+MBC5+RUMBLE+SRAM+BATT");break;
		case 0x1F:Serial_println("	Pocket Camera");break;
		case 0xFD:Serial_println("	Bandai TAMA5");break;
		case 0xFE:Serial_println("	Hudson HuC-3");break;
		case 0xFF:Serial_println("	Hudson HuC-1");break;
	}
	Serial_print("ROM size:");
	data =readByte(0x0148);
	switch (data){
		case 0x00:Serial_println("	256Kbit = 32KByte = 2 banks");break;
		case 0x01:Serial_println("	512Kbit = 64KByte = 4 banks");break;
		case 0x02:Serial_println("	1Mbit = 128KByte = 8 banks");break;
		case 0x03:Serial_println("	2Mbit = 256KByte = 16 banks");break;
		case 0x04:Serial_println("	4Mbit = 512KByte = 32 banks");break;
		case 0x05:Serial_println("	8Mbit = 1MByte = 64 banks");break;
		case 0x06:Serial_println("	16Mbit = 2MByte = 128 banks");break;
		case 0x52:Serial_println("	9Mbit = 1.1MByte = 72 banks");break;
		case 0x53:Serial_println("	10Mbit = 1.2MByte = 80 banks");break;
		case 0x54:Serial_println("	12Mbit = 1.5MByte = 96 banks");break;
	}
	Serial_print("RAM size:");
	data =readByte(0x0149);
	switch (data){
		case 0x00:Serial_println("	None");break;
		case 0x01:Serial_println("	16kBit = 2kB = 1 bank");break;
		case 0x02:Serial_println("	64kBit = 8kB = 1 bank");break;
		case 0x03:Serial_println("	256kBit = 32kB = 4 banks");break;
		case 0x04:Serial_println("	1MBit =128kB =16 banks");break;
	}
}
And with a script in python with the following code:
while ser.inWaiting()>0:
            data = ser.readline()
            print(data.decode("ASCII"))#just print the lines received.
Done this, the cartridges could be read. Some examples:
Pokemon Silver Japanese:
Title of the game in ASCII:POKEMON_SLVA XJ

Gameboy/Gameboy Color?	Cartridge with color function

Super Gameboy functions?	Cartridge with SGB functions

Cartridge Type:	ROM+MBC3+TIMER+RAM+BATT

ROM size:	8Mbit = 1MByte = 64 banks

RAM size:	256kBit = 32kB = 4 banks
Beast Wars(I did not know the name, it is a Japanese game):
Title of the game in ASCII:BEAST WARS

Gameboy/Gameboy Color?	Cartridge with color function

Super Gameboy functions?	Cartridge with SGB functions

Cartridge Type:	ROM+MBC5

ROM size:	8Mbit = 1MByte = 64 banks

RAM size:	None
Tetris:
Title of the game in ASCII:TETRIS

Gameboy/Gameboy Color?	Cartridge with no color function

Super Gameboy functions?	Cartridge without SGB functions

Cartridge Type:	ROM ONLY

ROM size:	256Kbit = 32KByte = 2 banks

RAM size:	None
Tamagotchi:
Title of the game in ASCII:GB TAMAGOTCH 1

Gameboy/Gameboy Color?	Cartridge with no color function

Super Gameboy functions?	Cartridge with SGB functions

Cartridge Type:	ROM+MBC1+RAM+BATTERY

ROM size:	4Mbit = 512KByte = 32 banks

RAM size:	64kBit = 8kB = 1 bank
Project Folder
Not the most commented code ever. You can download the project here.
Conclusions
That is it. The hardware works. I had a lot of trouble because of simple mistakes, but I can remember each of them now. I hope not falling in these traps anymore.
Next goal? Start the bank switching code for at least the MBC1.
Thanks for reading. See you next post. o/

This work is licensed under a Creative Commons Attribution-NonCommercial-ShareAlike 4.0 International License.
Relacionado / Related Posts
 Engenharia Reversa do Testador de Componentes GM328A + Tetris!
- GM328A reverse engineering, new firmware and Tetris!
 Rodando o jogo do T-Rex em um testador de componentes
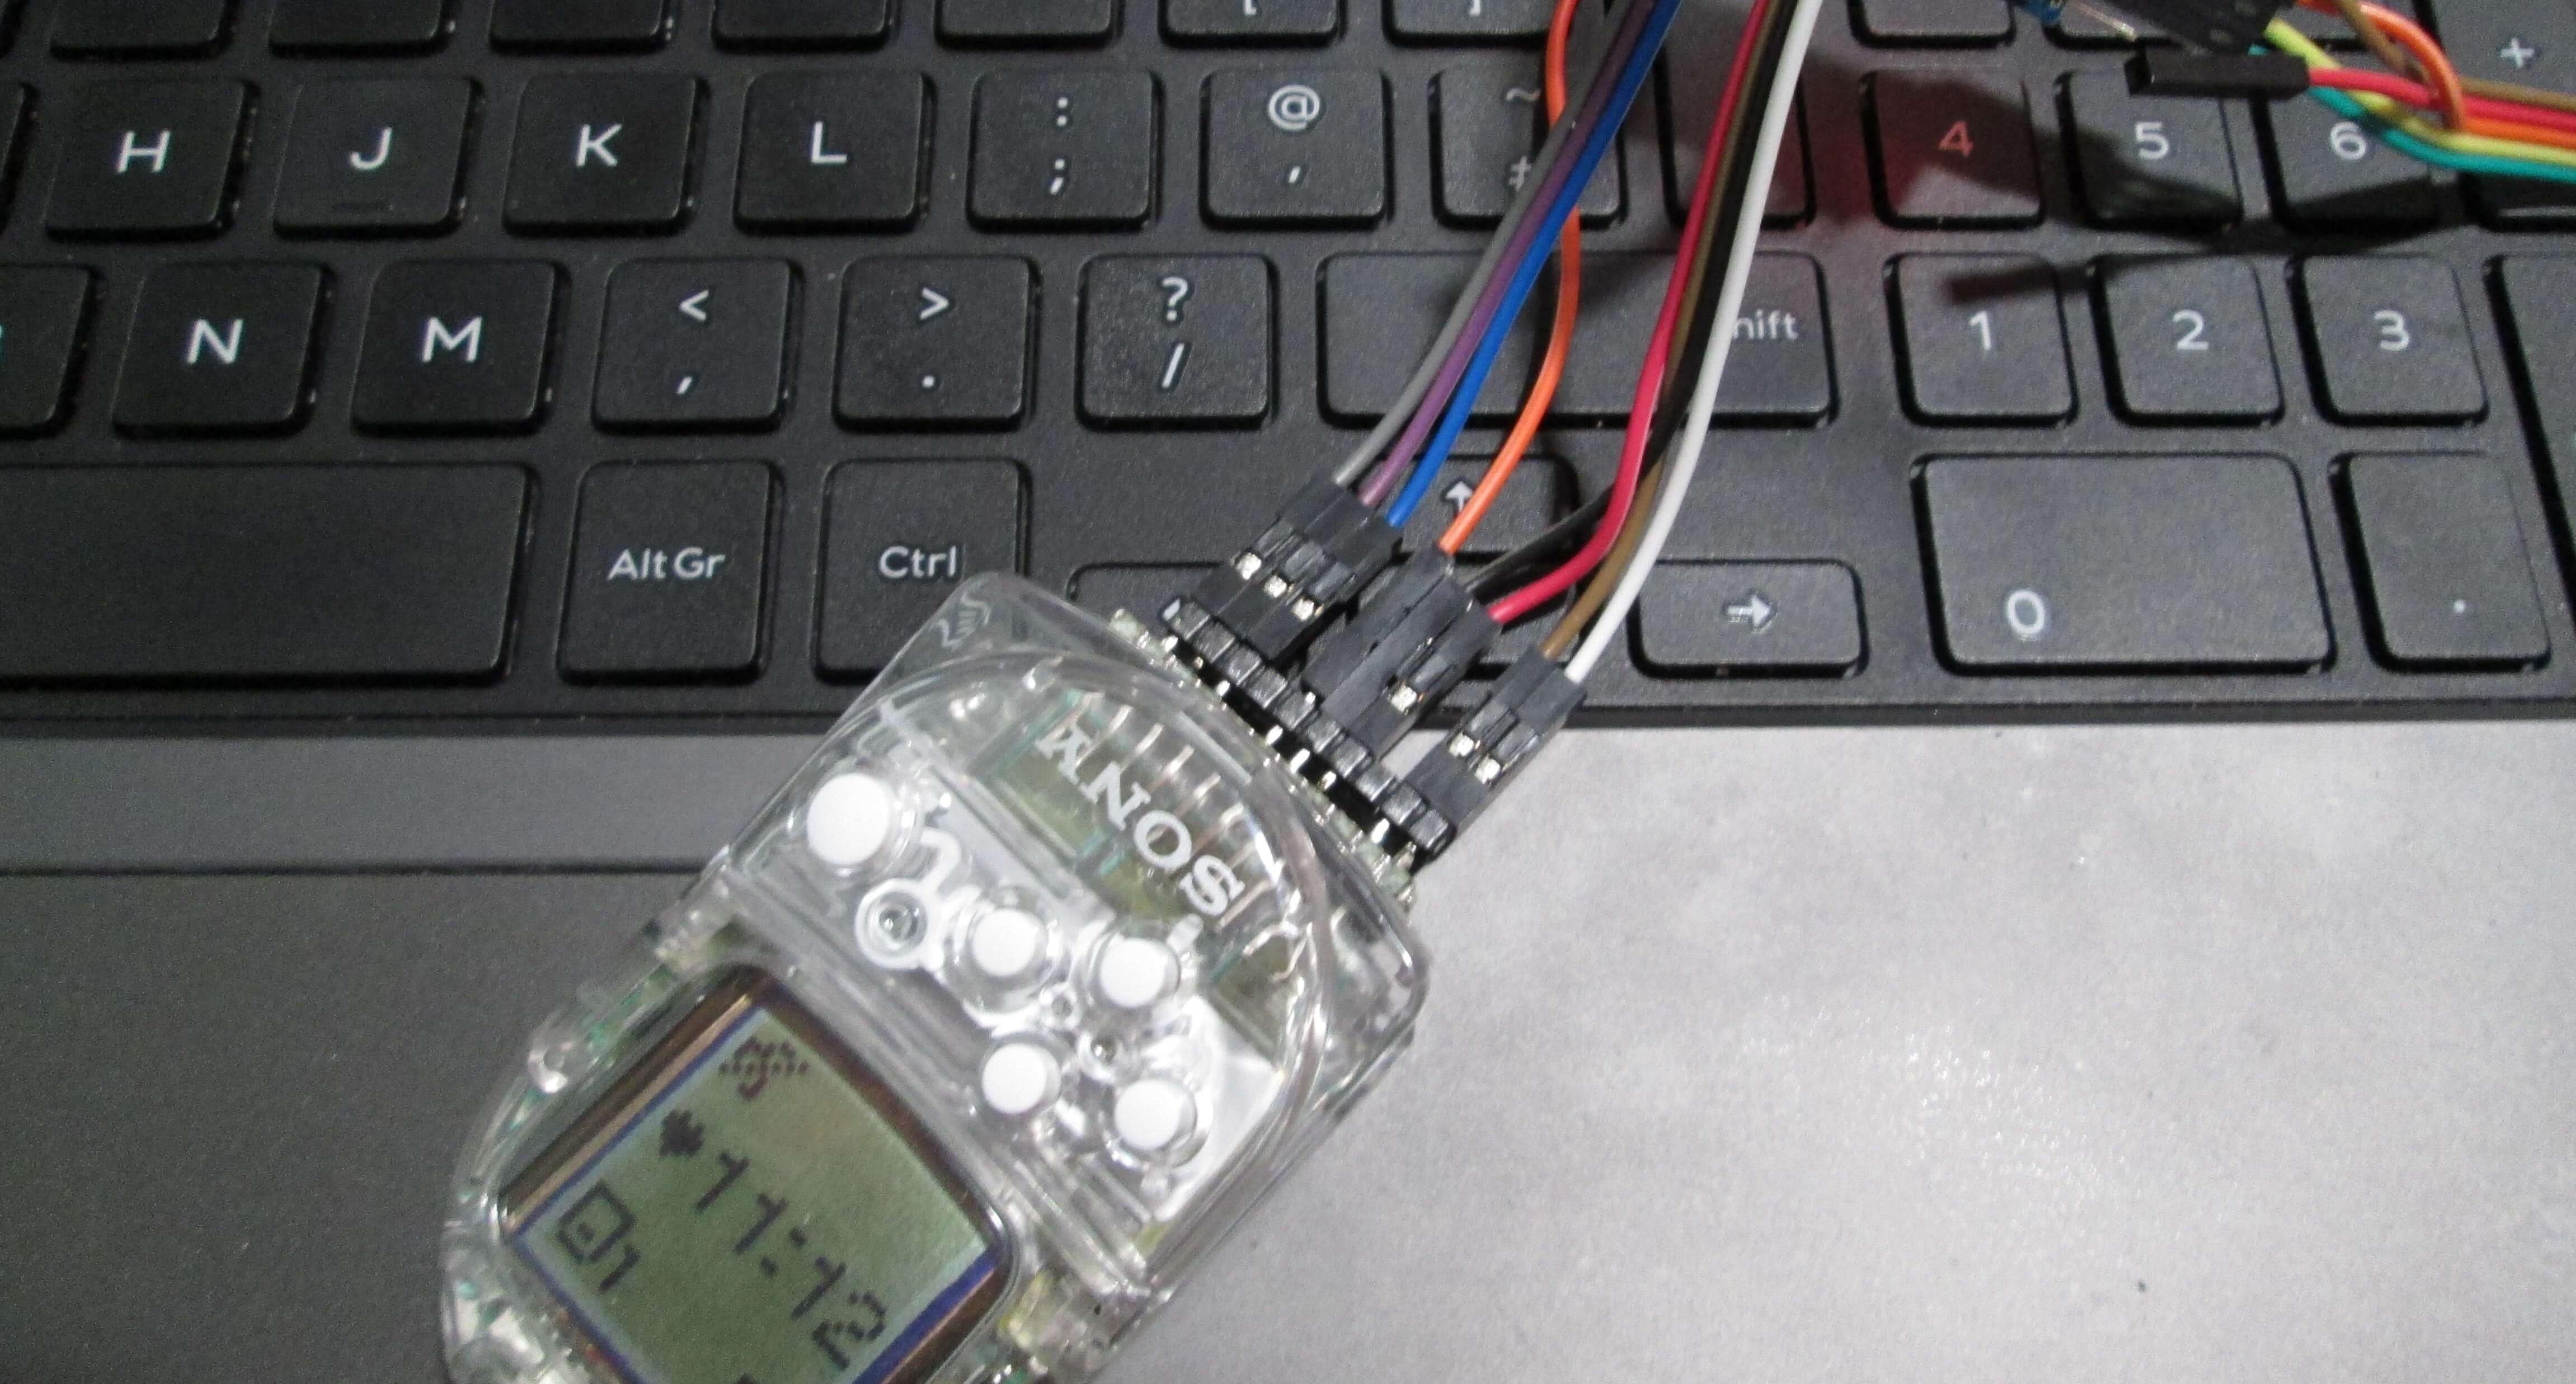 Backup e gravação de Memory Card PS1 (Arduino & Python)
 Game Boy Advance service manual and schematics.
 Natureza ajuda a criar bateria 10x melhor
Man! Great work!
Thank you!